TABS

Tuesday, December 18, 2012

YUP! I'm back with a YUMMY Sugar Cookie RECIPE

What? I know right? I had to clean out the cobwebs out this page. LOL! Crazy, crazy few months. I've been doing photo as a sideline job / hobby, so I have neglected my baking page *gasp*. Yes, yes I have, and I feel bad.

As I typed this up, I am constantly up and back to the kitchen trying to make dinner. I'm making lazy dinner today, cheeseburger macaroni. I'm also trying to get my supposed to be Christmas cookie going. As I am on my second batch of cookies, my trusted Beater Blade broke in half in the middle of mixing *sad*.  Anyway,  I'm just glad that I finished my sugar cookies before it broke. 

This recipe is by far the best sugar cookie I've ever tasted. I like it plain with no fancy frosting or addition to it. I like it the way it is. It's best when it's still a little warm.

I apologize I didn't take any photos at all during this process. I'm pretty sure you will do fine. This cookie recipe is super easy. I'm not sure where I got this recipe from, but all I can say is I have tweaked it more than enough so it's perfect for me.


What you need: 

  • 1  cup butter softened 
  • 4 oz cream cheese (I buy the 8oz block since I make 2 batches anyway and just split it in half)
  • 3/4 cup sugar
  • 2 tsp. almond extract
  • 1 egg
  • 3 cups all purpose flour
  • 1/8 tsp. salt

What to do:
  1. In a large mixing bowl, beat butter, cream cheese and sugar till fluffy.
  2. Add the extract and egg.
  3. Stir in flour and salt until blended.
  4. Cover with saran wrap and refrigerate dough for at least 2 hours but no longer than 24 hours.
  5. Heat oven to 375F.
  6. On a lightly floured surface, roll 1/4 of the dough at a time to 1/8 inch thickness. (Keep the other dough on the fridge if making double batches). Cut dough with cookie cutter and place on a parchment lined cookie sheets.
  7. Bake for 8-10 minutes or until sides are light brown. Immediately remove from cookie sheets to cooling rack. Cool completely.
  8. Frost cookies as desired.

Enjoy and wishing you and your family 
a very 
Merry Christmas & a Happy New Year!!!

~ Claire from NY ~

Tuesday, October 30, 2012

Crunchy stuffing cheesy chicken bake RECIPE


Hey everyone! How long has it been? I'm back, again!

Western New York is safe from Sandy. The storm gave us a little bit of shake and a little scratch, but overall our town and the surrounding ares is safe. Some areas are without power and school closed.

Wishing and hoping everyone their safety and stay safe!

So here we are again. This is why you're here right? To check and see if I have more super easy recipe? Well, here's another one that I'm sure your family will love.


Here's what you will need:

  • 1 box of stuffing mix for chicken (6 oz.)
  • 1 lb. boneless / skinless cut into cubes or bite seize pieces (cooked)
  • 3 cups frozen or fresh broccoli florets (frozen thawed and drained)
  • 1 can cream of chicken soup (10 3/4 oz.)
  • 1/2 cup milk
  • 2 cups shredded cheddar cheese


How to make it:
  1. HEAT oven to 400F.
  2. SAUTEE or boil chicken with salt and pepper (set aside)
  3. PREPARE stuffing as directed on the box
  4. MIX broccoli and cooked chicken in a baking dish (9x13" pan)
  5. ADD cream of chicken, milk and cheese mix well and top with stuffing.
  6. BAKE for 20 minutes or until the stuffing is slightly crispy, cheese melted and heated through.


Tuesday, June 19, 2012

End of the school year gift for the Teachers


.............................. No idea on what to type. I've been gone for so long. Sorry everyone for not posting any yummy recipes for quiet sometime. Then I come back and post something that's not even food related? Heh!? What is up with that YO!  

Well, we all know that summer is pretty much here and about 3 more days of half a day of school left in our town. 

Every year or pretty much any Holidays or special occasion I try to make something homemade for my kids teacher/s and their bus driver. Like on Christmas I made them handmade bracelets in their favorite color, with the help of my babies and also last year I made them reversible tote bags as an end of the year present and it was a hit. Everyone loved it.

This year is a bit different. I took a rest from making stuff because of my right hand hurting. I am blaming the crochet hook, moving heavy furniture or my heavy purse, I think? LOL!

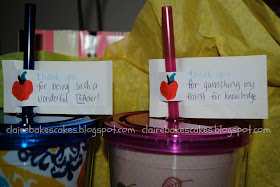
I opted for a semi homemade (I made the tags? That's homemade) this year. I bought some reusable acrylic drinking cups from the Christmas Tree Shop. They have tons of assorted design and 2 different sizes. I got 2 large and 3 medium cups, which I should have bought more. The large ones are $3.99 and the medium size ones are $2.99 plus tax. 


The tags I made by hand, since our printer retired a few months back and never had the chance to get a new one.


I bought a bunch of assorted single serving drink packets.


All ready to go.


~~ Thanks for stopping by and make sure leave a comment below and say hi ~~ 
 

Sunday, April 22, 2012

Red velvet (from the box) chocolate chip cookies Recipe


I blame pinterest for this crazy baking happening lately. LOL! Actually, I will blame the person that got me into pinterest. Who got me into pinterest anyway? I can't remember, but whoever it was, is in bigggggg trouble. No not really. I thought facebook was bad.

Anyway.

I was pinning the other day and I saw a post (can't remember what it was) but it led me to THIS site. So when I like what I see on a blog or site, I will sit here and pretty much look through the whole entire site till the very end. That's what I did. I sat here in front of the computer and just looked at How Sweet it Is blog. You should go and check it out. She has some amazing recipes and her photos are super cute and so pretty.

Red velvet anything is big with everyone. This little cute girl named Riley loves it when I make anything red velvet. I know so, 'coz her mom told me that my red velvet cupcake is the best there is. Ohhh, I love that girl. So when I saw THIS recipe. I knew I had to try it and share it with Riley.


Here's what you need:
  • 1 box Red Velvet cake mix
  • 2 eggs
  • 1 teaspoon vanilla
  • 1/3 cup vegetable oil
  • 3/4 cup chocolate chips
To do:

  1. Preheat oven to 350F*
  2. In an electric mixing bowl, combine cake mix, oil, eggs, and vanilla. Mix until a dough forms. Fold in chocolate chips. Roll into balls and bake at 350 for 8 minutes.
**  For the chocolate chip, I know her recipe says 3/4 cup, but I love chocolate chips too much and I want each and every bite would have a lot of chips so I used a 1 cup and a few extras. LOL!


** Also, I tried using the hand mixer with this and the batter was too thick so I used my standing mixer (Kitchen Aid). Then I used my spatula to mix in the chocolate chip. The dough will be very thick and I used my ice cream scooper so I will get an even ball and cookies. I used the 1 inch scooper.


My cookie ball. I used a 1 inch ice cream scooper.


Always and even and uniformed cookies.


My kids are going crazy at this point and I bet if they could tackle me for a cookie, they would have.


My daughter even snuck one out and she go caught, 'coz I can see her chewing hahaha. It was funny to watch.


So what are you waiting for? Go and bake, you will love it. You can use this creamcheese frosting recipe if you want to make a sandwich cookie, but not necessary. The cookie itself if good the way it is.


~~ Thanks for stopping by and make sure leave a comment below and say hi ~~

Tuesday, April 17, 2012

Gluten Free Chocolate Truffle Tarts with Raspberry RECIPE


Every time my BFF comes to visit, we sometimes always ends up making something with chocolate. Last time she was here, which was only a few weeks ago we made THIS. Then a couple weeks later she calls and says she was coming over again and that she wants chocolate. I mean come on, who can resist chocolate right? I googled and searched online for something good that I haven't tried yet, and if you know me I'm not big on sweets. So when I saw the recipe for the truffle tart with raspberry, I knew I had to make it. I called her and told on her to stop at the store and grab the raspberry, only to find out that the store ran out. So, we opted for strawberry, which wasn't bad, but the raspberry would have definitely made the taste different and better.


I know you can't wait to make one too, so here it is.


Here's what you need:


     * 1 1/2 cups fine chocolate wafer crumbs (I used Simplebites)
  •      * 6 tablespoons melted butter
  •      * 1 recipe Dark Chocolate Truffles (RECIPE FOLLOWS)
  •      * Fresh raspberry and extra for topping (In my case I used strawberry)

Directions:


1. Place chocolate wafers into a food processor and mix until finely crumb.  Transfer into a bowl and add the butter and mix well. 
2. Spoon 2 tbsp. of crumbs to the cupcake liner and press. I used the bottom of the shot glass to press the crumbs.
3. Place raspberry in the center of each cupcake liner and take your truffles that was in the ziploc bag and snip the side corner and fill the cupcake liner with the truffle mixture up to the top and smooth the top. Refrigerate until set. 


Simplebites Extreme Chocolate Mini Cookies (All natural, wheat free, gluten free)


Chopped up dark chocolate for the truffle. (Recipe for the truffle is below) 


Dark Chocolate Truffles:


  • 1 cup heavy cream
  • 12 ounces good quality bittersweet chocolate, chopped ( I used baker's Bittersweet)
  • 1 teaspoon pure vanilla extract


Chopped up bittersweet chocolate


Hot heavy cream added to the chocolate

Waiting for the truffles to cool down and whipped


How to make the truffles:


1. In a saucepan, bring the cream just to a simmer over low heat (don't over heat). 
2. Pour the cream over the chocolate in a big enough bowl and stir to melt the chocolate. 
3. Add the vanilla and stir until smooth. 
4. Set aside to cool for 30 minutes at room temperature. 
5. Beat the chocolate at medium speed with a hand mixer until it gets thick and light colored. 
6. Transfer into a big ziplock bag.


~~ Thanks for stopping by and make sure leave a comment below and say hi ~~

Tuesday, April 10, 2012

Pudding Pops and beyond - Recipe


I first saw this post in Pinterest. This is one of the few that I have actually tried and tested right away. I've made it twice already in 1 week. Between the hubby, the kids and friends with their kids who stops by. I had to share it. It's just that good.

The first time the kids and I made it, more like the kids offered and went on to whatever they were doing and me slaving in the kitchen. Seriously though, it's super easy you don't need your little helpers, who mysteriously appear and offer their helping hand when you're all done and the spoon and beater blades need licking.

Anywhoooo!

You will need 3 ingredients + the cups and popsicle sticks
* 1 small package of Jell-O pudding (I used chocolate)
* 1 1/2 cold milk
* 2 cups cool whip

** The 2nd time we've made this (sorry I didn't get pics) we've added crushed oreos and mini marshmallows in the mix. Next time we're trying different kind of pudding. Little man said the green kind (he meant pistachio).

* 3 oz. dixie paper cups
* popsicle sticks (I used plastic spoons, you will know why down below. It's under one of the photos)


* Mix milk and pudding in a large bowl. Whisk until thick.


* Add cool whip and mix well.


* All ready to be eaten scooped into the cups and freeze.


* Scoop into the paper cups all the way to the top and insert the stick or plastic spoon. So why plastic spoon you ask? Well, I have a thing with wooden items. I'm paranoid that my kids or anyone would get a sliver on their tongue or fingers using the popsicle stick. Is that bad?  Just thinking about it gives me the  heebie-jeebies. LOL! Laugh all you want when you're eating one with a wooden stick and get a sliver, we'll  see who's laughing then?


All ready for freezing.


I also cut up some aluminum foil to cover the top so it won't get freezer burn on top. Not that this will be sitting in the freezer that long.


Couple of hours later and it's ready to eat. Yum Yum Yummmmm!!!


Sorry I can't help myself. I had to take a bite.


~~ Thanks for stopping by and make sure leave a comment below and say hi ~~ 
 

Friday, April 6, 2012

Easter Treats for the Family ** RE-POST


**Re-post**
With Easter just around the corner. I don't really have anything in mind on what to make. Will be spending Easter dinners with Family so I am not cooking or making anything this year. Wooohooo@ I get to relax. So, instead I am re-posting this post from before.

I hope everyone enjoys their Easter Sunday!

Hi Everyone!

I wanted to post this really quick before Easter. I know it's tomorrow but my internet was broken for a couple of days and I couldn't post anything.

I won't make this long so I will just show you the pictures :-)
I made Easter Basket cupcakes for the kids, and load it with lots of sweets. LOL!

Peepsssssssssssss :-) yey! and I use the pastel M&M's

This is supposed to look like butterflies but not really sure if it does :-)

Some kind of flower...

This I made for someone :-) not telling, just in case she's looking at this blog.

Made cake pops, does it look like eggs?

I even dipped them in the sprinkles :-)

Carrot cake cakeballs... and drizzled with orange chocolate milk.

This is where I will put the cake balls :-)

clairebakescakes